Turn your old laptop into a secure cold storage Bitcoin wallet
TL;DR: You can turn any old laptop into a secure cold storage Bitcoin wallet by installing Ubuntu, permanently disabling networking, and running Electrum offline. This gives you hardware-wallet-level security without buying a dedicated device.
Consider your Bitcoin security score as a number on the scale of 1-10, with 1 being the least secure option and 10 being the most secure. Trezor, Ledger, Bitbox02, Coldcard and other physical hardware wallets are closer to the 10 score mark while hot wallets such as Exodus, Jaxx and other closed-source web/mobile apps closer to the 5 score mark and leaving your coins on an exchange is probably on the 1 or 2 score mark.
With that in mind, we suggest anyone with a considerable amount of money invested into Bitcoin to purchase a physical hardware wallet as it allows you to get the best from both worlds, security and ease of use. Of course, even the most secure setup is useless if you lose access to it -- that's where crypto wallet recovery comes in. But what if we wanted to get a similar security score using an old laptop? In the following article we will detail exactly how to accomplish just that.
Requirements:
- A laptop, anything from the last decade should do.
- An Ubuntu 20.04 LTS Boot USB Drive (Instructions)
- An additional free USB stick of any size
Following these instructions should get you up and running with your fresh Ubuntu 20.04 LTS installation.
Permanently Disable Networking
To make sure none of your wired/wireless network interfaces are loaded on boot, in the Network settings screen, make sure everything is set to OFF
Download Electrum wallet
Electrum is a great open source Bitcoin wallet that can also work completely offline. Download the latest version to your home PC or any other internet capable machine. Make sure to also download the Signature file and save both files to your additional USB Stick mentioned in requirement no. 3

Once both files are on the USB stick, plug it to your new and secure Ubuntu laptop and copy over both files to your Ubuntu Desktop
Verify the integrity of your Electrum wallet
It's always important to make sure that the file you intended to download from the official website corresponds with what you actually downloaded, to do that, let's first import Electrum's public key:
gpg --keyserver keys.gnupg.net --recv-keys 6694D8DE7BE8EE5631BED9502BD5824B7F9470E6
Then, we can verify that what we've downloaded corresponds with the file produced by the Electrum developers:
gpg --verify ~/Desktop/electrum-4.1.2-x86_64.AppImage.asc ~/Desktop/electrum-4.1.2-x86_64.AppImage
A valid output looks like this:
gpg: Signature made Thu 08 Apr 2021 16:47:31 IDT
gpg:                using RSA key 6694D8DE7BE8EE5631BED9502BD5824B7F9470E6
gpg: Good signature from "Thomas Voegtlin (https://electrum.org) " \[unknown\]
gpg:                 aka "ThomasV " \[unknown\]
gpg:                 aka "Thomas Voegtlin " \[unknown\]
gpg: WARNING: This key is not certified with a trusted signature!
gpg:          There is no indication that the signature belongs to the owner.
Primary key fingerprint: 6694 D8DE 7BE8 EE56 31BE  D950 2BD5 824B 7F94 70E6
Once we verified the Electrum file, we can change its permissions so that we can execute it correctly by running
chmod +x ~/Desktop/electrum-4.1.2-x86_64.AppImage
Now you can go to your Ubuntu Desktop and double click the file to run Electrum and go through the wizard to create your wallet.
Exporting your master public key
Your xPub/zPub is your master public key, allowing you to generate public Bitcoin addresses and create transactions later to be signed on your laptop. Even though your master public key does not expose your private keys and cannot lead to any online theft, you should not share it with anyone or to any device that you do not have full control over since it poses a privacy risk since holding the master public key allows the holder to view and link any transactions you've executed.
To export your master public key, go to Wallet -> Information
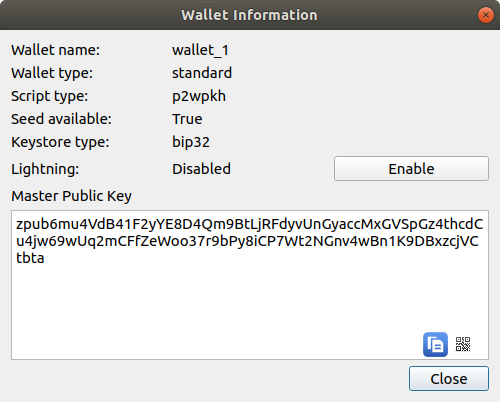
The prefix for Legacy accounts starts with xpub while the prefix for Segwit accounts starts with zpub as shown in the image above.
Copy your master public key and save it to your USB stick as a text file.
Importing your master public key
On your home PC or any internet capable machine, install Electrum as you did before on your laptop and plug in your USB stick that contains the text file with your master public key.
After launching your Electrum wallet, opt in to use 'Standard wallet' and then choose 'Use a master key' and paste in your xPub/zPub. Now that you've completed the wizard, you have a 'Watch only' version of your wallet on your home PC.
Receive and send coins from your offline wallet
Now that we have an offline laptop with Electrum installed (holding our private keys) and another instance of Electrum installed on our home PC (holding our public keys) we can use this setup to send and receive Bitcoin.
Sending Bitcoin is a bit of a lengthy process as you need to jump back and forth between your home PC and offline laptop, this is where physical cold wallets such as Trezor really simplify everyday usage without reducing your security level.
To receive Bitcoin you can simply use the 'Request' tab on your home PC and get a fresh Bitcoin address. Any Bitcoin sent will be displayed in your watch only wallet while the private keys for that wallet are only stored in your disconnected laptop.
To send Bitcoin, you will need to:
- On your home PC, create an unsigned transaction
- Save it as a text file to your USB stick
- Plug the USB stick to your offline laptop
- Load and sign the transaction on your offline laptop
- Save the signed transaction to your USB stick
- Plug the USB stick to your home PC
- Load and broadcast the transaction to the Bitcoin network
Create an unsigned transaction
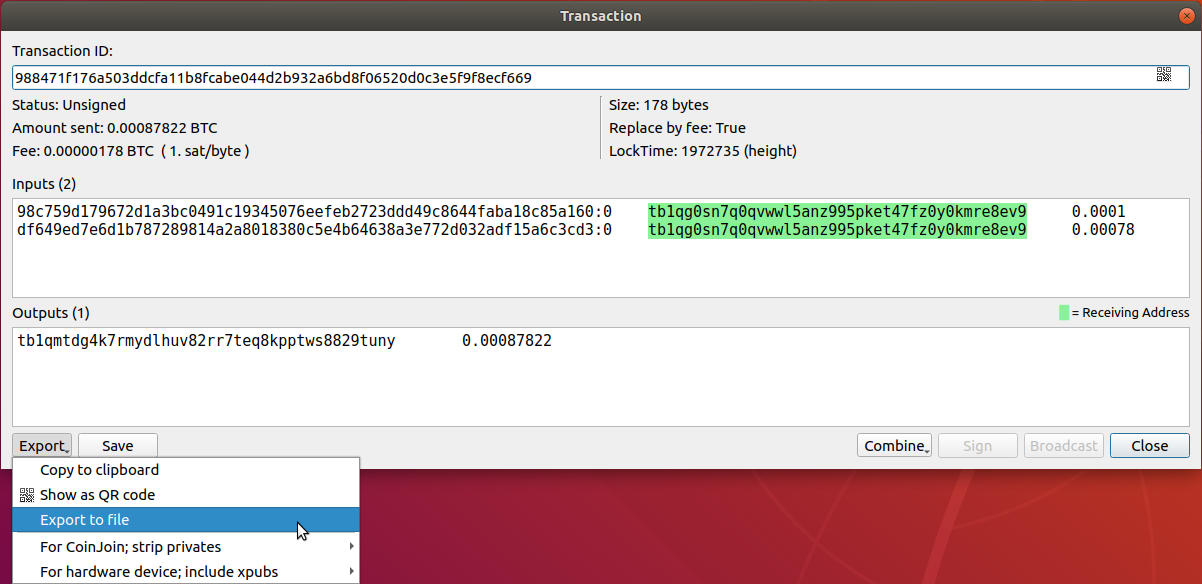
On your home PC's Electrum, go to the Send tab and fill in the address and amount to the relevant fields, click Pay, configure the fee and click Send. Then click the export button and select to save to file and navigate to your USB stick
Load and sign the transaction on your offline laptop
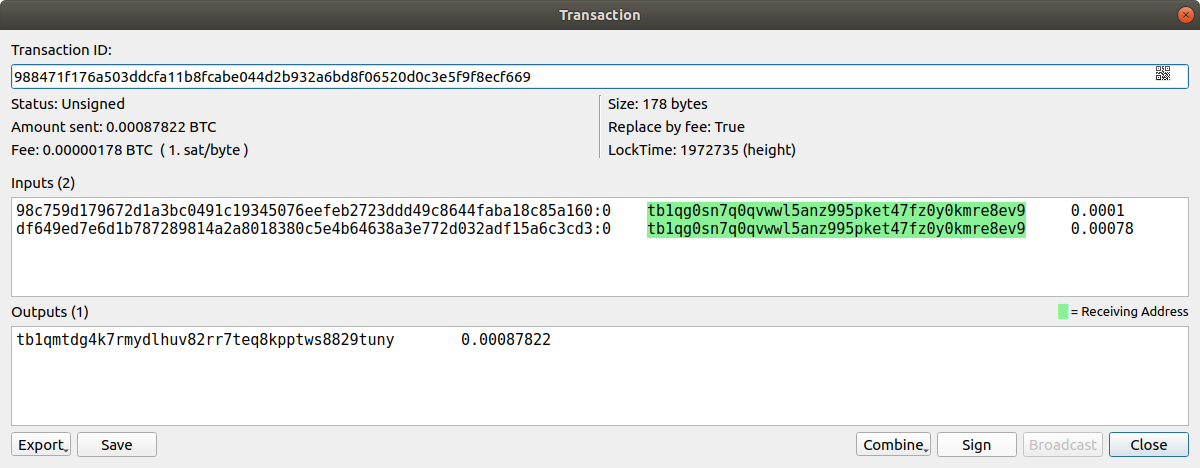
Next, plug your USB stick to your offline laptop and launch Electrum. Go to Tools -> Load transaction -> From file. Navigate to your USB stick and select the .pbst file saved in the previous step. You should be able to see that the 'Sign' button is now enabled, click it to sign the transaction. Next, as you did in the previous step, export the signed transaction to a file and save it to your USB stick.
At this point, you've created a transaction using your master public key, transferred it to your offline laptop, signed it and now we are ready to broadcast it to the Bitcoin network
Load and broadcast the transaction to the Bitcoin network
This is the final step, plug the USB stick back to your home PC and in your Electrum wallet go to Tools -> Load transaction -> From file. This time, load the .txn file which is the signed transaction.
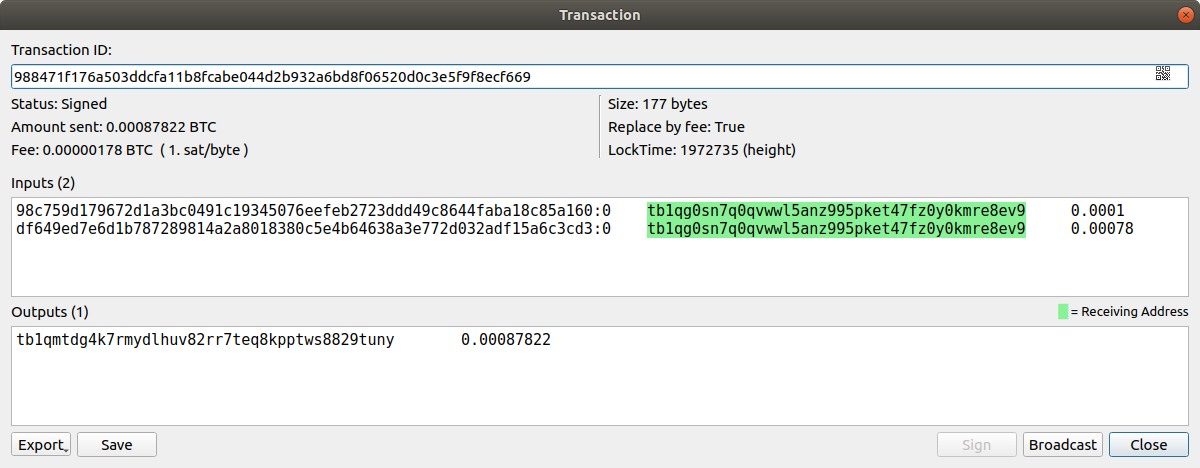
Clicking the Broadcast button will complete the process and broadcast the transaction to the Bitcoin network.